- First, have you registered for your expenses account?
- Download the Continia Expense App
- Log in to the mobile app
- Claim expenses - start your expense report
- Claim expenses - add expenses to your expense report
- Claim expenses - add mileage
- View and edit ‘open’ expense report
- Submit your expense report for payment
- Track the status of your expense report
- Want to use the web portal?
The Continia Expense Management Portal is a cloud-based solution designed to simplify and automate the process of expense management for businesses. The software allows users to capture, submit, and track expenses from anywhere, anytime, using a web browser or a smartphone app.
You can claim expenses incurred on College business, including meals, accommodation and travel (including mileage). Please refer to our expenses policy for clarity on what you can claim for.
If you are claiming expenses for different roles / different teams, you may need to submit more than one claim/report. Please check with your RCPCH contact.
First, have you registered for your expenses account?
The first step is to register for expenses. You need to this via your RCPCH online account on this website, where you will also add details of the UK or overseas bank account you are using. It's quick and easy, and we have instructions.
How to register for your expenses
Download the Continia Expense App
Once you've registered, you'll get a Welcome to Continia Expense Management email. You can click on the Mobile App link in that email, or you can scan the below QR codes or click on the links.


Log in to the mobile app
Open the Continia Expense App on your smartphone. Log in to your Continia account by entering the email address and password that were used to activate your account from the Welcome email and swipe Sign in.

Claim expenses - start your expense report
To claim a new expense, you must first create an Expense Report .
Tap the New Report button from the home screen.
Please ensure that you add all your expenses and mileage to a report prior to submission.
If you are claiming for different departments within the College please check the division and department codes. If they are different you will need to submit separate reports.

You will then be prompted to name the Expense Report (Description). Try and pick something that is Please choose a name relevant to you and the reason for the expense - if you claim multiple times during the year, this will make it easier for you to find the relevant claim in the future.

Then complete the Division and Department fields.
You will not be able to create the Expense Report if these three fields are not completed.
If you do not know the division and department, contact RCPCH staff contact.
The Contact Person field is free text – please put the RCPCH’s contact name here if you have this information.

Then tap Create at the top right. The screen will now change to show Save in the top right hand of your screen and Submit at the bottom.
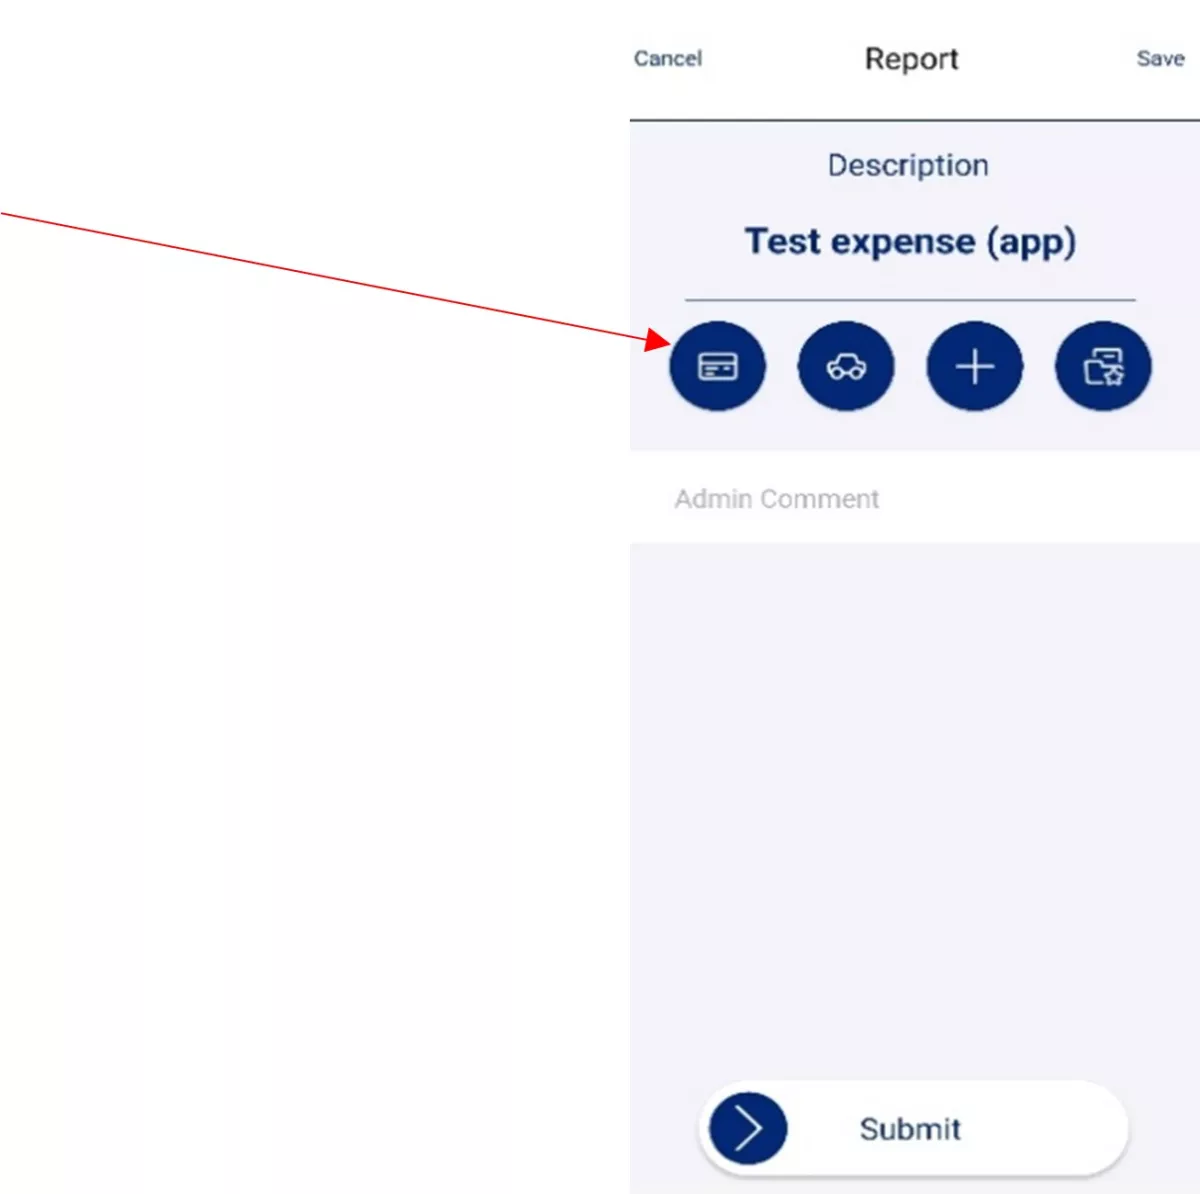
On the next screen, you will be given the following options:

Claim expenses - add expenses to your expense report
There are two options to add expense items to your expense report.
- Complete the expenses details and then upload the receipt(s).
- Upload the receipt and the Document AI reader will insert some of the details directly from the receipt.
Option 1 - Complete the expenses details and upload the receipt
Tap on the leftmost blue circle icon to add the expense to the report.
The next screen below will show you the name of the report you are adding the expense item to. The Division and Department are taken from those selected for this expense report.
The Document Date field is automatically populated with today’s date. This date must match the date of the receipt for this expense item. Tap on the date to change.
- Amount: Enter the amount and change the currency if applicable.
- Payment Type is automatically defaulted to CASH/PRIVATE CARD.
- Expense Type: Select from the drop-down list.
- Description is a free text box. If the receipt is related to a date range, then please ensure the date period is written within the description.

Once you have entered all the required information and attached the necessary documentation, tap Save at the top right. This will take you back to the header page of your Expense Report.
Option 2 – Upload the receipt first and the Document AI reader will insert some of the details directly from the receipt
Tap on the leftmost blue circle icon to add the expense to the report. (See above)
Take a photo of the receipt using your smartphone’s camera by tapping on the leftmost camera icon. Or upload any receipts or documentation related to the expense from your smartphone/device by tapping on the middle paperclip icon.
- Payment Type is automatically defaulted to CASH/PRIVATE CARD.
- Expense Type - Select the relevant category from the drop-down list.
- Description is a free text box. If the receipt is related to a date range, then please ensure the date period is written within the description.
- Division and Department are automatically populated from the previous header page.
Whichever method of attaching receipts is used, the Document AI reader within the app should capture amount (and currency), date, description and populate it automatically. If not, please enter all details correctly. You can edit these fields.

Once you have entered all the required information and attached the necessary documentation, tap Save at the top right.

This will take you back to the header page of your Expense Report.

You can also upload any receipts or documentation related to the expense claim from your phone’s storage by tapping on the middle blue circle with the paperclip icon, or taking a photo of the receipt with your smartphone's camera using the leftmost blue circle with the camera icon.

Add more expenses to your expense report
On the Expense Report main screen you will see the total of your Report so far.
")
To add another expense, follow the steps for option 1 or option 2 above. Repeat as needed.
Claim expenses - add mileage
To add mileage to the Expense Report, tap the blue circle icon with the car symbol. Please note that you must be in the Expense Report you want to add the mileage claim to before you tap the Add mileage icon.

On From address, start typing the postcode/location or enter the full postcode; pick the correct postcode/location. Do the same on To address.

The app may present different routes from the information you have provided - you can select the correct one.
Once you have populated the route, the app will automatically calculate the distance travelled, though you can edit this if you have travelled more (or less) than the app estimates.
Complete the Document Date and Description fields.
Tap Save.
")
Once you save the mileage expense, you will be given three options:
- Save and create return - This will auto-populate the mileage claim for the return journey, based on the locations entered from the outbound journey on the previous screen. (Remember to change the date, if applicable.) Once again, tap Save once complete, then Save again if you’ve finished adding trips.
- Save and continue from - You can add another mileage expense that is not a return journey.
- Save - This will take you back to the list of expenses on your Expense Report.

View and edit ‘open’ expense report
From your dashboard on the app, you can view and edit open expense reports before you submit them. (Remember, the open reports are draft and have not been submitted for approval and payment.)
Tap the Open icon. You'll see a list of any open reports not yet submitted, and follow links to edit and submit.

Submit your expense report for payment
Once you have entered all the required information and attached any necessary documentation, go into the Expense Report you want to submit, tap on Save at the top right, and then swipe Submit at the bottom of the Expense Report screen.
")
Swipe Submit to confirm submission of the Expense Report. Your expense report will now be submitted to the appropriate person for approval.
Track the status of your expense report
On the dashboard tap the History icon. You'll se your submitted expense reports, with the status and any comments or feedback from the approver.
")
Want to use the web portal?
You can also use the Continia web portal, on any modern web browser, to claim and track your expenses. We have instructions on how to use the web portal.